

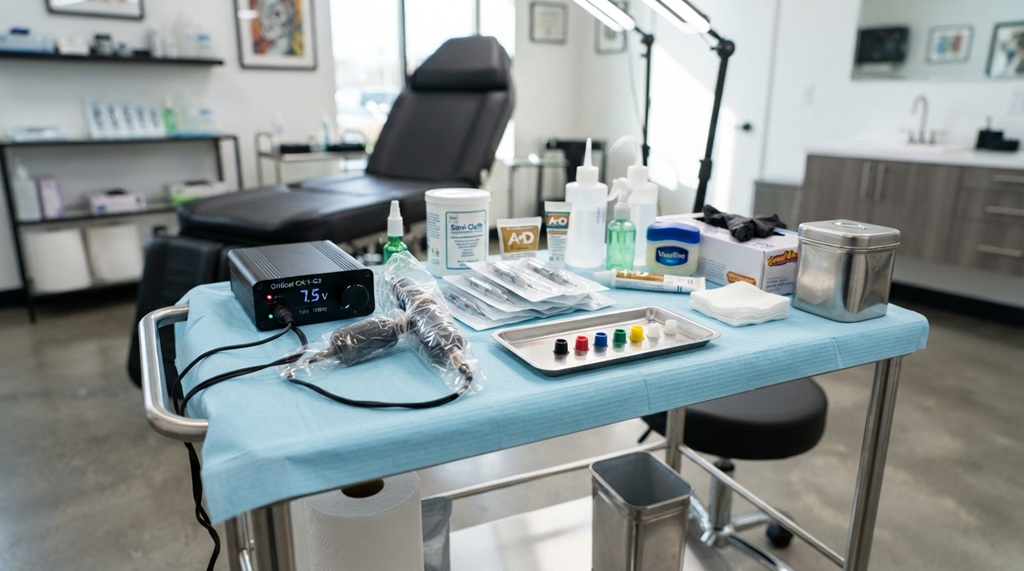

A safe tattoo workstation follows one rule: keep clean supplies and used supplies fully separated at all times. You also need a clear layout, so you can reach every tool without breaking your sterile field. Get this wrong, and you risk cross-contamination or a messy, unprofessional session. Get it right, and your station runs itself.
This guide walks through a full workstation setup. We’ll cover the station itself, the clean/dirty zone system, tray order, equipment placement, and the small habits that separate a chaotic station from a professional one.
You’ll find tips here whether you’re setting up your first station in an apprenticeship or refining a setup you’ve used for years. The goal stays the same: control contamination, cut unnecessary movement, and keep everything within reach.
Choosing the Right Station Setup for Your Space
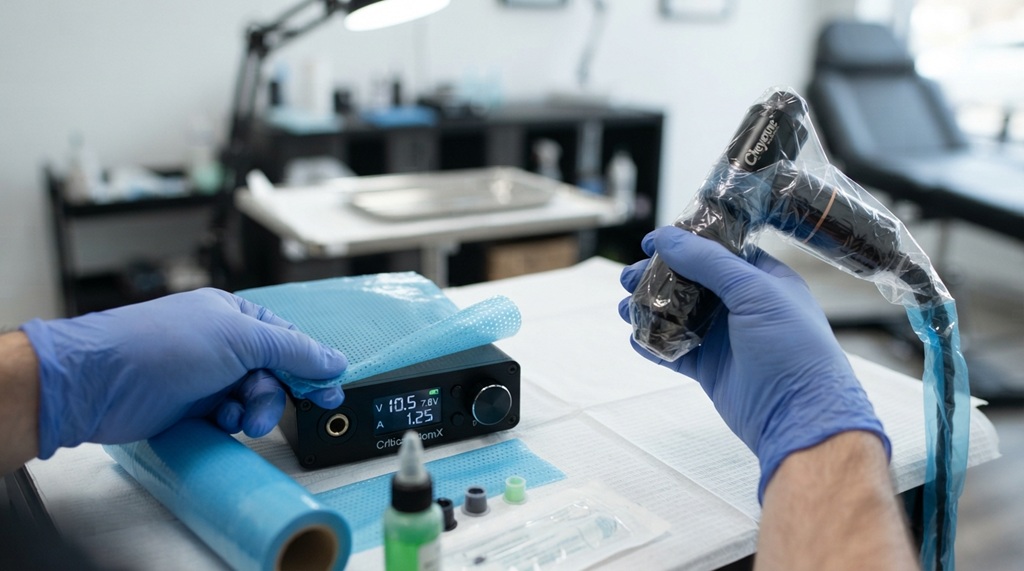
Your ideal station setup depends on your space. You might work in a private studio, a shared shop chair, or a mobile guest-spot situation. But the core goal never changes: a stable surface, strong lighting, and a layout that keeps sterile and non-sterile items apart.
Master the Fixed Workstation Setup for Maximum Efficiency
For permanent studio setups, your workstation serves as the operational anchor of your craft requiring a seamless blend of ergonomics, safety, and fixed workflow zones. A professional station should always center around a high-grade hydraulic client chair, an adjustable stainless-steel tray, high-intensity swing-arm lighting, and a biohazard sharps container positioned within immediate arm’s reach. By keeping this environment stationary, you eliminate the friction of daily reconfiguration; you can establish permanent sanitation zones, dedicated barrier-wrapped surfaces, and immediate access to a handwashing sink. As you streamline this physical space, remember that equipment layout is only half the equation mastering stencil application is equally vital to a flawless session, so take a moment to refine your technique to use tattoo transfer paper.
Mobile or Guest-Spot Stations
When you work in an unfamiliar shop, portability matters more than permanence. Use a rolling cart or a fold-flat tray table. Pack a “kit” of pre-packed supplies: barrier film, single-use tubes, ink caps, and gloves. This lets you build a clean station in any room in under ten minutes. The layout logic stays the same as a fixed station. You’re just packing it to travel.
Establishing Clean and Dirty (Contaminated) Zones
Every safe station splits into two areas: a clean zone for sterile, unopened supplies, and a dirty zone for anything that touched skin, blood, or a used needle. This one rule shapes every other decision in your setup.
Pick one side of your tray for untouched items: your machine, cord, power supply, and sealed cartridges. Use the other side for anything used during the tattoo, like wipe containers and soiled gauze. Many artists also keep a small transition zone in the middle. This gives your gloved hands a spot to set something down without crossing fully into either side. Once an item crosses into the dirty zone, don’t move it back to the clean side. This rule holds even if the item looks unused.
Barrier Coverage: What to Cover and Why It Matters
Barrier film protects any surface your gloved hands or machine might touch. It’s faster and more reliable to remove a barrier than to fully disinfect a textured surface between clients. Industry infection-control guidance treats any touchable surface as a contamination risk if you leave it uncovered.
Cover your tray table, the machine grip, the clip cord, and the chair’s armrests and headrest. Also cover any spray bottles and light or lamp handles you might adjust mid-tattoo. Build this habit early: cover surfaces before you open a single supply, not after. If you touch an uncovered surface with a bare hand to place the barrier, you’ve already broken the point of using one.
Organizing Your Tray for an Efficient Workflow
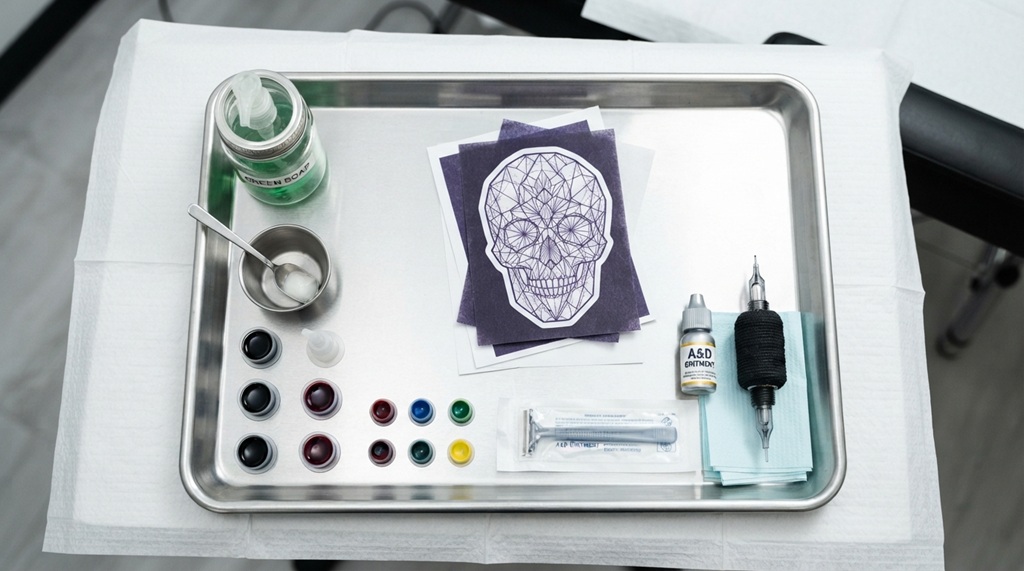
Arrange your tray in the order you’ll actually use each item. This keeps you from reaching across your sterile field mid-tattoo. Place ink caps closest to your machine hand. Keep wipes and spray bottles within reach of your non-machine hand. Store rarely-touched items, like extra cartridges, toward the back or on a second tier.
Setting Up Ink and Cartridges
Fill your ink caps before you glove up for the tattoo. Use a fresh cap for each color, and cover or cap your ink bottles right away to stop airborne contamination. Keep cartridges sealed until the exact moment you load them into the machine. Opening extra cartridges “just in case” wastes sterile stock and clutters your dirty zone if you never use them.
Positioning the Machine and Power Supply
Place your machine, clip cord, and power supply on barrier-covered surfaces, within easy reach. Route the cord so it can’t drag across your tray or the client’s skin. Here’s a tip most guides skip: coil your extra cord length and clip or tape it to the cart. A dragging cord creates a contamination risk. It’s also one of the most common ways ink caps get knocked over mid-session.
Sanitation Supplies and Sharps Disposal
Set up your hand sanitation supplies and sharps container before you open the first needle. Don’t wait to fetch them mid-session. Keep hand sanitizer or a sink nearby for pre- and post-glove handwashing. Add surface disinfectant for cleanup, and mount a puncture-proof sharps container close enough that you never walk away holding an exposed needle.
Keep gloves within reach for quick changes. Most artists change gloves several times per session, such as after touching a phone or adjusting a light. Store a second, unopened glove box nearby too. This way, you never touch a contaminated surface just to grab a fresh pair.
Lighting, Ergonomics, and Client Comfort
Good lighting and posture aren’t optional extras. Poor lighting causes missed detail and eye strain. Poor ergonomics causes hand fatigue, which hurts your line quality over a long session. Use a daylight-balanced LED lamp on an adjustable swing arm. This lets you angle light across the skin and see texture and swelling without harsh glare or shadow.
Set your chair or stool height so your working arm sits at a relaxed angle. Avoid reaching up or hunching down. Position your client’s body so you don’t twist your torso for long stretches. Many artists skip this step for years, tattooing without adjusting their seat height for each specific piece. Over time, this raises the risk of wrist and shoulder strain, a common concern shared widely within the tattoo community.
Common Mistakes to Avoid When Setting Up
Even experienced artists repeat a few setup mistakes that hurt safety or speed.
- Covering surfaces after placing equipment. Barrier film only protects what it covers. Apply it first.
- Overfilling ink caps to save time. This wastes product and raises the risk of cross-contamination between colors.
- Placing the sharps container out of reach. This forces you to carry an exposed needle across the room, a leading cause of needle-stick injuries.
- Mixing clean and dirty tools on one side of the tray. Even briefly, this blurs your zone system and forces a full re-sanitation.
- Skipping a final walk-through before the client sits down. A 60-second check of barrier coverage, sharps access, and supply completeness catches most errors early.
Frequently Asked Questions
How long should it take to set up a tattoo station?
A practiced setup usually takes 10 to 15 minutes once you’ve organized your supplies. A mobile or guest-spot setup in a new space may take a bit longer. Speed comes from repetition, not from rushing any single step.
What’s the minimum barrier coverage I need?
Cover the tray table, machine grip, clip cord, and any chair or lamp surfaces you might touch mid-tattoo. Skipping barrier film on a touchable surface creates a real contamination risk, even if it looks clean.
Can I reuse ink caps or cartridges between clients?
No. Throw away ink caps and cartridges after each session, no matter how much product remains. Reusing them, even for the same client on a different day, breaks standard infection-control practice.
Do I need a sink at my station, or does hand sanitizer work?
Hand sanitizer works as an in-session backup, but proper handwashing with soap and water is the industry standard whenever a sink is nearby. Many studios place their stations near a sink for this exact reason.
What’s the biggest efficiency mistake new artists make?
New artists often open more supplies than they need “just in case.” This wastes sterile stock and clutters the dirty zone with unused items. Learn to estimate your supply needs for each piece instead of opening everything by default.
Conclusion
A safe, efficient tattoo station comes down to a few repeatable habits. Keep your clean and dirty zones separate. Cover every surface before you touch it. Arrange your tray in the order you’ll use it. Keep sanitation and sharps disposal within reach from the first minute of setup. None of this needs expensive gear. It just needs a consistent system you build once and repeat every session, until safety and speed become the same habit.